My Algebra 2 class is largely student-paced through Desmos Activity Builder. Before starting polynomials, we did a small unit on solving quadratics. Below is a collection of Desmos activities I created for my quadratics unit and the start of my polynomial unit. A lot of these Desmos activities are created using CPM curriculum.
Quadratics
Quadratic Formula: Students review and practice using the quadratic formula (song included)
Typically, I use Desmos Activities at the beginning or end of a lesson. I have found it as a great tool to introduce or wrap up a class. However, recently I have been using activity builder more in my classroom every day. A new thing I have been doing is pairing Desmos Activites with worksheets.
Pros of pairing them together
Students are writing more!
After students complete one problem on their sheet, they follow along with the Desmos Activity until they are told to stop and move to the next problem.
Problems go more in depth after they solve it on their paper. Students are asked to explain their answers.
Students can check their answers.
Instead of being called over to ask if “they did it right” students can check their answers on their own and move at their own pace.
Students can also compare their answers with other students all around the room
You know how ALL of your students are doing at all times
You can see if they are doing it correctly all in one place. I’ll walk around with my iPad as I help students.
If you realize that a lot of students are struggling with a certain problem you can put the activity on teacher mode and talk about it as a class.
You get immediate Feedback!
This is a great space to give an “exit ticket”, see where students are, and how you can help them!
Here is an example of a worksheet and the Desmos Activity that goes along with it about graphing and solving systems of equations.
When simplifying rational expressions, students always seem to want to simplify TOO much (and incorrectly) !! Below are a few common”over simplifications” that I’ve seen.
This is where #lifelessonswithFinney kicked in. We started talking about the Mafia. Yes, the Mafia. Not only were we talking about the Mafia, but we were talking about killing off family members of the Mafia.
The polynomial is our numerator is a family. The Mafia Family. The denominator is our hitman.
I asked my students what they thought would happen if they tried to kill only one member but not the rest of the family.
“We’d be in trouble!!!! They’d come after us!!!!!!!!!”
Exactly. So we if we want to kill off one member of the family then we have to kill them all! This is the only way that you’d make it out alive! If you can’t kill them all then it is fully simplified. Killing doesn’t mean you have to get rid of it completely. However, you must “hit” every member of the family.
When I started my factoring unit, I was definitely a little worried. I’ve seen factoring taught a ton of different ways by using short cuts, but my students have never seemed to remember the “tricks” once the unit was over. They never truly understood what they were actually doing when they were factoring a quadratic or why they would factor.
Although I’ve never taught factoring entirely this way before, I decided to teach it only using the box method.
Day 1
I started the unit by teaching double distribution. Instead of using “FOIL” of the “arrows” I decided to teach dd by discussing area. I drew four boxes all connected on the board and wrote two numbers on the top of the boxes and two numbers going down the left side of the boxes. I told my class that each box what a piece of land and asked how I could find the total area of all the land.
“Easy! Find the area of each piece of land and then add them together!”
Next instead of using all constants, I added in variables. They were then multiplying (x+5)(x
They were then multiplying (x+5)(x+6) and (2x+5)(3x+5) and (3x^2 +3x +3) (x+5) no problem. I had them notice that like terms were ALWAYS on the diagonal. For every problem, I had them circle the like terms on the diagonal.
Day 2
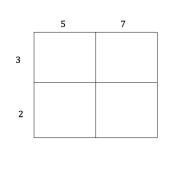
I started out class by having students multiply (x+5)(x+2) using their boxes. Once combining like terms, they got x^2 +7x +10 as their “area”. Next, I posed the questions of “what if you were given the area to start… how would you find the dimensions of each piece of land”. They knew that x^2 went into the first box and 10 went into the last box on the right, but we were unsure on how we could break up the diagonal. They KNEW that the diagonal had to add to 7x. But how do we break this up?!!!
We first decided to focus on the area we knew. We KNEW that x^2 only factored into x and x. We then decided to look at the factors of 10. So we had (10,1) (2,5) and thought as a class “DO any of these add up to 7?!!” YES! We then put 2 and 5 as the dimensions and multiplied to see if it worked.
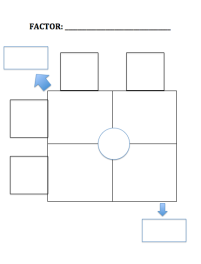
I gave out a template the had a box already created and a space to write the factors of the first and last term. On the diagonal of the box, there is a circle. This circles purpose was to visualize combining like terms. To check to make sure they added up to the correct number. I put each of these templates in a page protector. This way they could use a dry erase marker and easily erase if they made a mistake. During this class period, we practiced factoring terms where a=1 and had my students get into the habit of writing all of the factors of the first and last terms in order to get in the habit for when we started quadratics of a>1.
I was so impressed how FAST my students learned factoring. It actually made sense to them! Factoring the difference of perfect squares even came easy to them because they knew their diagonal had to add to be zero!!
Day 3
Factoring terms where a>1.. This is where the box method takes a little more time. However, I’d rather it take longer and have the students understand what they are doing than have them memorize a process. Went through the same thing we did the day before with filling in our boxes and listing our factors. From here I told them they would have to “guess and check” their different factors. This is where having their templates came into great use. They could check all of their factors and if it didn’t they wouldn’t have to redo everything.
The template my students recieved
My students loved how visual the boxes were. They also saw factoring as a puzzle and had a lot of fun with it. I did a few days of practice with whiteboarding and scavenger hunts and did a 15-minute review before the test. Out of my 9 students who took the quiz 5 of them got 100%. This NEVER happens in this class. This quiz included multiplying binomials, factoring a=1 and a>1 and perfect squares!
Things I would change
Practice more with finding the factors of numbers.
I want to create problems in my boxes and list the factors of the first and last term and add the like terms to a number that’s given to them already in the box before we start a>1. Then I would have them create the factors and add to that number. AND then introduce factoring for a>1
After reading Sarah Hagan’s post on Snowball Fights, I knew I wanted to try it out in my Algebra 1 class. We are currently finishing up our chapter on solving systems of equations. Although my students have learned how to solve by elimination and substitution, they have not been put in a situation where they had to choose which method to use. I thought this would be the perfect opportunity.
To prep, I created sheets of paper with a system of equations written on it. There were also three boxes, for elimination, substitution, and checking.
I handed out pieces of paper to each student and told to crumbled the paper into a ball. I told them that we were going to have a snowball fight. However, there were basic rules to follow.
When I say stop the snowball fight stops. You grab the nearest snowball and open it.
If you are the first one to solve the snowball, then you can choose to solve the system of equations by elimination or substitution.
Round 2: You are the second person to solve this snowball! Use the other way to solve your equations!
Round 3: You are the third person to solve the snowball! Check the work of the people before you by plugging in their solutions. If their solutions are incorrect, fix them with a red pen.
Things I had to add to my rules during class:
Do not target one specific student during the snowball fight 😦
You MUST participate and every student must be standing at the start of the snowball fight.
Make sure your windows are shut!! Lots of snowballs were thrown out the window!! I’m on the first floor, so my students climbed out the window to retrieve them.
This snowball fight brought up a lot of good questions such as
“Substitution is soooo much easier in this problem!! Why do I have to do elimination?!”
I love when students ask “why?!” They were curious, and that’s when learning really starts.
This brought up a great discussion question. Why do we use a particular method to solve systems of equations? Is there one method that is ALWAYS easier to use.
Instead of leading this discussion, I decided to have my students explain to their peers why one method works better for certain problems.
For the snowball they were “checking” I had them decide which method would be easier for that problem. They then grabbed a whiteboard/went up to the whiteboard and wrote down which method was best for their problem. They then solve their system of equations using that method.
When every student finished we placed their work around the room. Every student then described the method they used and WHY it was the best way for their problem.
We had some time left at the end of class and my students wanted to have another snowball fight. For this snowball fight, I had them create their own problems. When it came time to solve the snowballs, students could choice any method they wanted as long as they could explain WHY they chose it.
Overall, this was a pretty fun class. Snowball fights can get a little hectic, but I’m glad I tried it out .
I want to start off by saying how proud I am of my students by the effort they put into this activity. My algebra 1 class can sometimes be hectic, and can be difficult to have the entire class focused and motivated to work.
I started my solving systems of linear equations unit with word problems. I really wanted my students to understand the context behind solving systems of equations.
One the first day, we just practiced forming equations from word problems. I saw a blog post, after I started this unit, about numberless word problems. Next time I teach this, I want to start using numberless word problems and move on from there.
We then used word problems to learn solving systems by graphing, and my substitution. We are moving on to world problems with elimination this week.
We just had a four day weekend, and I wanted to refresh the substitution method before we moved on.
I had every student work with a partner and each pair had a whiteboard. I gave the following directions:
Create a word problem on your whiteboard. Make sure you can create two linear equations from your world problem.
After you create your word problem, raise your hands for more directions
Some students had difficulty making their world problems. They’d call me over and I’d remind them of the information they needed to add by asking questions about what else they’d need to know in order to solve the problem.
After their word problem was approved, I then gave them folded piece of paper. On the inside of the paper, they were to define their variables, create and then solve their equations.
During this time I had plenty of time to walk around the classroom and answer questions. I also check each group’s work on the problem.
Once every student was finished, I put line pieces of paper next to each whiteboard. Each whiteboard was now a station and the students created the answer keys for their OWN problems.
I think it is important for students to create and work their OWN problems. It gives them a type of ownership and it helps them realize what information needs to be included. They also love putting their peers names in their word problems. It makes going around to each problem a little fun.
This was an awesome wrap-up activity. It was simple, but it required students to work together, create their own problems, ask questions, and solve their peers work. Students also created ALL of the PROBLEMS and the ANSWERS! This required no prep! It also gave me time to really work with students who were still strugglings.
Although I am an active user and creator of Desmos Activity builder, this week was my first time ever using Desmos Polygraphs. Oh my Gosh, let me tell you… this activity was so much fun!! Remarks that I received from my students were….
“Can we play this all class?”“Let’s keep playing through break!”
“This is helping so much!”
Polygraph takes after the board game Guess Who?!When students sign into the polygraph they are partnered with another student in the class. One student is the picker and the other is the guesser. The picture chooses an object and the guesser has to ask yes/no questions to try and figure out the object. When one pair finishes a game then they become paired with another student. SO MUCH FUN.
This week I played Polygraph in both my geometry and algebra 1 class.
I love Desmos, but I never used Polygraph. I wanted to try it out and understand it, so I actually signed in as two different people and played myself!! 😝 It was so much fun!
I introduced these polygraphs to my class after we discovered the different types of special quadrilaterals. I wanted them to practice their vocab by asking yes/no questions to figure out which quadrilateral their partner chose. My students loved it! They said it really helped them define the different types of quadrilaterals. It was a great way to learn special quadrilaterals instead of memorizing their differences.
Algebra 1
I used Polygraph to introduce scatter plots to my algebra 1 class. Before I explained scatter plots and correlations I had my students sign in and play each other. They were describing the scatter plots using vocab that I didn’t teach them yet!! It was funny because I had one student ask “What does this have to do with math?!!” I kept telling him to trust me and it would all fit together. I let them play for about 15 minutes before pulling my class back together. I showed a positive correlation scatter plot and asked my students to describe what they saw. I then had a student come up to the board and draw a line through the data that they thought would best describe it. This is when my students made the connection with a postive correlation and positive slope. YAY slope. We then did the same thing with negative and no correlations. We also looked at strong, moderate and weak correlations.
Next I had students go back to Polygraph to play again. This time, they had to use the vocabulary we discussed to describe and eliminate each scatter plot. It was great to see how their use of vocabulary improved the move games they played.
If you haven’t played Polygraph yet I definitely recommend it. There are a ton in Desmos, but you can also create your own! Don’t be like me and wait so long to try it!!!
Back from Christmas break and I was ready to dive back into my algebra 1 class. The last time we were really together (before midterms, winter break, and winterm) was about a month ago! AH!
Before we left, we were working on linear equations. Today I decided that I wanted to review graphing linear equations from slope-intercept, point-slope, and standard form. Instead of having my students do a worksheet or Delta Math I decided to make the day a little more interesting. For my class of 11, I used tape to create 5 coordinate planes on the ground. Everyone had a partner and there was one group of three. I had my students numbers their axises while I passed out material for the rest of class. Each group also had one whiteboard and one marker.
I handed each group a hand full of tiny paper squares. I created my squares by cutting up a laminated piece of white paper. In the mix of squares, there were also a few blue squares. My students also received a piece of string.
After the materials were passed out, I posted an equation on the board in slope-intercept form. Together, we identified the y-intercept and placed the blue square on that point. Students then used the slope to find the other points on that line. They marked their points with the white squares. Next, students placed their string through the points they created on their graphs. Placing the string through the points helped students see if they made a mistake while graphing.
For the rest of class, I would place one equation on the board at a time and students would graph their equation. We practice graphing in slope-intercept and then moved to standard and point-slope form. Students used their white boards to change their equations from standard to slope-intercept form. When we got to point-slope form I had students identify the slope and point on their white board before graphing.
I LOVED having students work on their own coordinate plane on the floor. I could walk around and see exactly where students were struggling and could help them right away. I had students mark their intercepts with the blue squares so they could visually see the intercepts. I liked using the squares to mark the different points on the line. If students made a mistake they could easily fix it. I think my students also liked being able to physically plot all of the points and place the string down to create the line. This was a pretty fun review after winter break and a great way for me to assess my students understandings.
Playing Kahoot in class is always fun. My algebra 1 students especially love it! Instead of a traditional midterm, the school I teach at does a “midterm experience”. I decided that for the experience I was going to have my students create and then play their own Kahoots! This experience was broken up into two days. At the beginning of the first day, I told my students that by the end of their experience they would create a Kahoot focused on one of the concepts covered this semester. However, they are unaware of which concept until day 2.
On day one, I had students create one-sheets that covered the topics covered year. All concepts had to be included on my one sheet. A “one-sheet” is a brain dump of a certain concept. I typically use one-sheets to help students study and review for a test. Students had to make a “one-sheet” for each concept. They could use any resources to create their one-sheets. I collected their one-sheets at the end of class on the first day.
On day two, students were assigned a partner and a concept. Students could only use theirs and their partners one sheet to create their Kahoot. Each Kahoot had to cover all the material from that chapter and include 10 questions.
After they created their Kahoots, they shared them with me and we played them as a class! It was great because I could grade their Kahoots while we were playing! It was also fun to see each others work!
I liked this assessment because it had them review all of the material we’ve done this year, but then they were only assessed on a certain concept. It was also fun to create their own Kahoots! Some of my students added pictures and videos into their Kahoots to make it more fun. We can also look back and play the Kahoots when it comes time to review for the final!
Below is the direction sheet I handed out to my students.
Day 1:
At the end of this experience, you will have created a Kahoot focused on one of the concepts covered this semester. However, you will not know which concept until day 2.
On day one, you will be create one-sheets that cover the following topics. All concepts must be included. You may use any resources to create your one-sheets. One sheets will be collected at the end of day 1.
Tools of Algebra
Order of operations
Combing like terms
Negative Numbers
Exponents
Adding, subtracting powers
Dividing and multiplying powers
Power of zero
Solving Equations
Solving one-step equations
Solving two-step equations
Solving multistep equations
Solving Equations with Variables on Both sides
Functions
Relating Graphs to Events
Relations and Functions
Function rules, tables, graphs
Writing a function rule
Linear Equations
Slope and Rate of Change
Slope-intercept form
Standard form
Point-slope form and writing linear equations
Parallel and Perpendicular lines
Solving and Graphing Inequalities
Inequalities and Their Graphs
Solving one step inequalities
Solving Multi-step inequalities
Graphing linear inequalities
Day 2:
You will be assigned a partner and a topic
You and your partner will create a Kahoot on your topic.
You can only use your one sheets to create your Kahoot
In my geometry class, I have been using Desmos Activity builder to teach finding points of concurrency algebraically. In order to assess my students on this unit, I decided to create a Desmos Activity. I also created a packet that had the same questions that were on my Desmos Activity for students to use to show their work. I like using Desmos because it allowed my students to check their answers easily by entering thier equations or coordinates. I can ask questions that don’t involve graphing, and it easily organizes students answers. It also made grading SUPER EASY.
When grading with Desmos you can either grade one student at a time by clicking on their name OR you can grade one question at a time. I decided to grade one question at a time. Because each students answers showed up at once for each problem I could quickly see which students answered incorrectly. You can also overlay all of the graphs to check students anwers quickly. If no students answered incorrectly I can see that immedietly.
In order to grade most efficiently, I created a grading grid (I usually use this to record homwork) with every student in the class’ name. Instead of putting the date at the top like I usually do, I put the Desmos slide number, the packet question number, and the amount of points each question was worth. I used this grading grid to grade this assessment. If student got the question correct I put a check in the box, if the student made a small mistake (and I could tell what they did from the answer) I would put minus the amount of points they’d lose for that question in the box. If I couldn’t figure out their mistake from their answer then I would write “check” in the box. When I finished grading all of the questions I would go through each students test. I ONLY looked at the problems where I wrote “check”. I use erasable pens when grading, so after I checked their work I could go back and change the grade in the box easily.
This was an extremely long assessment and took NO time to grade. Using Desmos for a quick quiz would be even easier! This was my first time using desmos for an assessment, but I’m definetly going to use it again!


 g about killing off family members of the Mafia.


 connected on the board and wrote two numbers on the top of the boxes and two numbers going down the left side of the boxes. I told my class that each box what a piece of land and asked how I could find the total area of all the land.
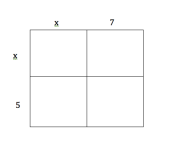 ind the area of each piece of land and then add them together!”
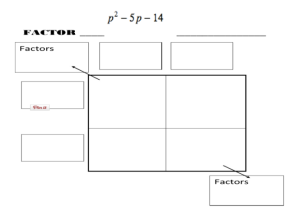 break up the diagonal. They KNEW that the diagonal had to add to 7x. But how do we break this up?!!!