My Twitter Experience

I usually don’t write posts like this, but I am feeling inspired and wanted to blog. 🙂

Tonight, we held the first ever #ElonEd twitter chat (my alma mater Elon University). I was first introduced to the educational use of twitter three years ago by Dr. Jeffery Carpenter. In my class (I think Teaching Diverse Learners? ) we were required to tweet a certain amount per week, tweet at others a certain amount, and participate in twitter chats.

Tonight, we held the first ever #ElonEd twitter chat (my alma mater Elon University). I was first introduced to the educational use of twitter three years ago by Dr. Jeffery Carpenter. In my class (I think Teaching Diverse Learners? ) we were required to tweet a certain amount per week, tweet at others a certain amount, and participate in twitter chats.

At this point in my education, I didn’t have too much to say. I only wanted to interact with my peers when I was on my “educational twitter” and didn’t really explore the magic of a hashtag. Throughout my education at Elon, we continued t0 use Twitter for educational purposes. My “required” class tweets started to become easier and I started to use twitter because I wanted to. It was a REAL resource for me to use daily. When it came to applying for jobs, I even put my twitter handle on my resume. My twitter became part of who I am as a teacher. #MTBoS became my daily hashtag and I identified with strangers who became trusted friends in my profession. I’m even speaking at and attending Twitter Math Camp!

Anyhow, tonight was the first #ElonEd chat. Our focus was on Your First Year in the Classroom. I volunteered “as tribute” to co-moderate the chat with Dr. Scott Morrison. I had never moderated a chat before so I was feeling nervous/excited/anxious waiting for it to start. I had two experiences from participating in this chat

Moderator

Screen Shot 2016-02-23 at 11.33.57 PM
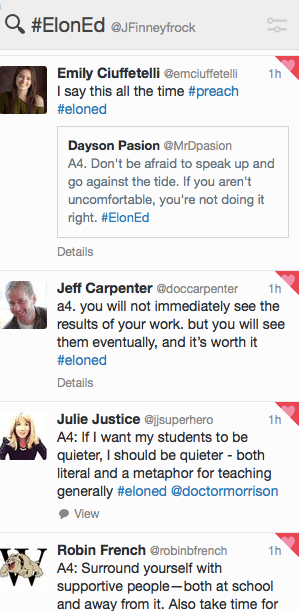
Being a twitter chat moderator is A LOT of work. I applaud all of you. We had around 15 people participate in our first chat. I wanted to respond and retweet and favorite everyone’s tweets! Usually, when I participate in a twitter chat, I don’t get to interact or see everyone’s conversations. This time, I saw EVERYTHING. Even if I was unable to add input, I read everyone’s tweets. It was a great feeling seeing conversations spark from a single question.

Elon Alum

This chat was special to me because I was interacting with past/present/future Elon Alum. The people I was chatting with had the same collegiate upbringing in the world of teaching. No one has the same college experience, but it was cool knowing that we all learned how to be teachers in Mooney. It was also great being able to relate to other teachers and give advice to pre-service teachers and receive advice!

I’ve been parts of twitter chats before, but this one was special. We also had some non-Elon students join which added a different layer to the chat. Honestly, I am looking forward to the next chat.  If you are interested in checking out our next #ElonEd chat join us on 3/8/16 at 9:40 PM. Topic: Technology in the Classroom.

Also check out our last chat on Storify !

As I lay in bed (way past my bedtime) writing this blog post, I’m feeling rejuvenated and ready for a day of teaching tomorrow. For this, I am extremely thankful for Twitter . Twitter allows me to vent, learn, explore, collaborate, and interact. Twitter connects people who have common interests. It gives teachers a way to grow personally and professionally daily.  If you are just starting out on twitter don’t give up on it. It takes a while to build a community, but once you do it can be magical. Tonight, I am thankful for Twitter, #MTBoS and #ElonEd. I am thankful to be a teacher. And I am thankful for being introduced to twitter as an inspired 20-year old motivated to be an amazing teacher.

To sum up this post, I love Twitter… it’s awesome. If you are teacher… USE IT!  On that note, I am heading to bed. Almost midnight on a school night!!!


Snowball Fights!

After reading Sarah Hagan’s post on Snowball Fights, I knew I wanted to try it out in my Algebra 1 class. We are currently finishing up our chapter on solving systems of equations. Although my students have learned how to solve by elimination and substitution, they have not been put in a situation where they had to choose which method to use. I thought this would be the perfect opportunity.

To prep, I created sheets of paper with a system of equations written on it. There were also three boxes, for elimination, substitution, and checking.

FullSizeRender 2.jpg

I handed out pieces of paper to each student and told to crumbled the paper into a ball. I told them that we were going to have a snowball fight. However, there were basic rules to follow.

  1. When I say stop the snowball fight stops. You grab the nearest snowball and open it.
  2. If you are the first one to solve the snowball, then you can choose to solve the system of equations by elimination or substitution.
  3. Round 2: You are the second person to solve this snowball! Use the other way to solve your equations!
  4. Round 3: You are the third person to solve the snowball! Check the work of the people before you by plugging in their solutions. If their solutions are incorrect, fix them with a red pen.

Things I had to add to my rules during class:

  1. Do not target one specific student during the snowball fight 😦
  2. You MUST participate and every student must be standing at the start of the snowball fight.
  3. Make sure your windows are shut!! Lots of snowballs were thrown out the window!! I’m on the first floor, so my students climbed out the window to retrieve them.

This snowball fight brought up a lot of good questions such as

“Substitution is soooo much easier in this problem!! Why do I have to do elimination?!”

I love when students ask “why?!” They were curious, and that’s when learning really starts.

This brought up a great discussion question. Why do we use a particular method to solve systems of equations? Is there one method that is ALWAYS easier to use.

Instead of leading this discussion, I decided to have my students explain to their peers why one method works better for certain problems.

For the snowball they were “checking” I had them decide which method would be easier for that problem. They then grabbed a whiteboard/went up to the whiteboard and wrote down which method was best for their problem. They then solve their system of equations using that method.

When every student finished we placed their work around the room. Every student then described the method they used and WHY it was the best way for their problem.

We had some time left at the end of class and my students wanted to have another snowball fight. For this snowball fight, I had them create their own problems.  When it came time to solve the snowballs, students could choice any method they wanted as long as they could explain WHY they chose it.

Overall, this was a pretty fun class. Snowball fights can get a little hectic, but I’m glad  I tried it out .

Dynamic Transformations using PearDeck and Desmos

I decided to teach geometric transformations (excluding rotations)  using a dynamic approach.  I also added in absolute value transformations so they could see transformations in point-slope/vertex/transformation form.

Day 1 – Translations

I started class by having my students sign into my PearDeck presentation for the day. When they signed in they were taken directly to a Translations Desmos Activity created by Andrew Stadel to introduce Translations. I had students sign into their accounts, so they could go back and look at their work on the activity later. Students worked through the activity at their own pace and once they all finished we moved to the next PearDeck slide.

Screen Shot 2016-02-17 at 4.04.38 PM

Instead of standing up at the front  board and “lecturing” about translations and how to do them, we were able to have a discussion! Students already knew how to translate figures! I used the drawing tool on PearDeck to practice translations. Students were asked to describe translations and then actually then translate them on their screens. While they were practicing, I was able to see the work of EVERY student on my Ipad. This allowed me to see instantly when a student was going in the wrong direction or plotted a point incorrectly. If I wanted to sit in my chair in the front of the room, I could still see every students’ progress and work as it was happening.


Day 2- Reflections

Reflections started the same way. Once they logged onto PearDeck they were taken to Cathy Yenca’s Reflections Desmos Activity. After students
explored on Desmos, we
came together as a class and practiced reflections on PearDeck.

Screen Shot 2016-02-17 at 4.04.18 PMScreen Shot 2016-02-17 at 3.34.27 PM


Day 3- Dilations

Screen Shot 2016-02-17 at 4.02.35 PM
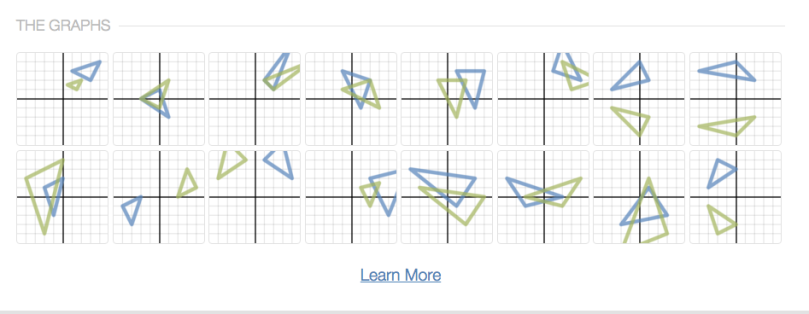
For Dilations, I decided to create my own Desmos Activity to start the lesson.  After they worked through the activity we had a great conversation of dilations and scale factors. This conversation helped WONDERS when I introduced similarity the following week. Students then practiced dilating images through PearDeck.

I also created a Desmos Polygraph to practice the transformations we learned so far. Students LOVE playing polygraph. It truly does help them speak mathematically and it’s a lot of fun 🙂

Day 4- Absolute Value Transformation

I created my Absolute Value Desmos Activity by editing an activitScreen Shot 2016-02-17 at 3.59.52 PMy created by Faith. As we did the previous days, students started with the activity and then we moved to practicing and discussing in PearDeck. In class, we called point-slope/vertex form transformation form. I have been introducing this form all year, so my students had seen it before. I think that it’s important to make the connection from geometric to algebraic transformations. We didn’t spend a plethora of time on it, but I think it really helps when they move on to Algebra 2.


Anyhow, using Desmos Activities to discover and learn transformations and PearDeck to practice worked out beautifully. Check out my Desmos and PearDeck pages to learn more about each of them!


The Real Barbie Girl: Proportions Come to Life!

Geometry students have all seen proportions before. I really wanted students to understand proportions and not just know how to solve them. After reading Julie Reulbach’s post on Barbie Proportions, I knew I had to try it out!

After a quick introduction and practice with solving proportions using a  PearDeck presentation, students were ready to start the activity.

In my A-block class (11 students), students work in groups of 2 and one group of 3. In D-b lock and E-block  (20 and 16 students) they worked in groups of 4. I liked the smaller groups better. Every student was ACTIVITY participating. As the groups became larger students started slacking off. However, I did collect every students worksheet with their Barbie Proportion work.

I LOVED this activity. Students could practice solving proportions, and see how DISproportional Barbies really are! A lot of my students were actually shocked about Barbie’s proportions! Especially the size of her legs and feet! Super long legs and realllly tiny feet!  I think that it gave them a great understanding of what it really means for things to be proportional. Students also loved measuring and tracing their peers on giant paper! What better way to learn about proportions than by making them come to life!!!

Create Your Own Word Problems: Solving Systems Stations

I want to start off by saying how proud I am of my students by the effort they put into this activity. My algebra 1 class can sometimes be hectic, and can be difficult to have the entire class focused and motivated to work. IMG_7241

I started my solving systems of linear equations unit with word problems. I really wanted my students to understand the context behind solving systems of equations.

One the first day, we just practiced forming equations from word problems. I saw a blog post, after I started this unit, about numberless word problems. Next time I teach this, I want to start using numberless word problems and move on from there.

We then used word problems to learn solving systems by graphing, and my substitution. We are moving on to world problems with elimination this week.

We just had a four day weekend, and  I wanted to refresh the substitution method before we moved on.

I had every student work with a partner and each pair had a whiteboard. I gave the following directions:

  • Create a word problem on your whiteboard. Make sure you can create two linear equations from your world problem.

IMG_7249

  • After you create your word problem, raise your hands for more directions
    • Some students had difficulty making their world problems. They’d call me over and I’d remind them of the information they needed to add by asking questions about what else they’d need to know in order to solve the problem.
  • After their word problem was approved, I then gave them folded piece of paper. On the inside of the paper, they were to define their variables, create and then solve their equations.
    IMG_7246

    • During this time I had plenty of time to walk around the classroom and answer questions. I also check each group’s work on the problem.
  • Once every student was finished, I put line pieces of paper next to each whiteboard. Each whiteboard was now a station and the students created the answer keys for their OWN problems.
    • I think it is important for students to create and work their OWN problems. It gives them a type of ownership and it helps them realize what information needs to be included. They also love putting their peers names in their word problems. It makes going around to each problem a little fun.

This was an awesome wrap-up activity. It was simple, but it required students to work together, create their own problems,  ask questions, and solve their peers work. Students also created ALL of the PROBLEMS and the ANSWERS! This required no prep!  It also gave me time to really work with students who were still strugglings.

Teach My Lesson: A Day of Dilations

This is the final week of the MTBoS blogging initiative! mylesson

This week I have been teaching geometric transformations.  Every day has had the same start. I had students check their homework by going on Haiku the moment they walk in. Students can check their work at their own pace and have the answers directly on their screen.

When they are finished checking their homework, my students then enter our class code in on PeardDeck . PearDeck creates interactive lectures. I embedded a Desmos Activity into the first part of my lesson for every transformation. As soon as my students log into PearDeck they are taken directly to this activity and are able to start at their own pace.

Today, students were learning dilations. They started working on the Desmos Activity I created that explored dilations using tables. Most of my students finished in about 2o/25 minutes. When they finished, I changed the slide to discuss as a class what they found out about dilations.

Next, students were able to practice dilations on PearDeck together. I gave my students a shapes and the dilation and they drew the dilation on their slide (I let them draw pictures if they finish early). I was then able to overlay all of the drawings to see if any of the students were off, and I could show individual students work as well.

When I PearDeck I usually bring in my Ipad so I can control the presentation from anywhere around the room. I could also see every students’ work on my iPad while they were working. This allowed me to see and fix student mistakes instantly.

We practiced 4 dilations together, then they were taken to another Desmos Activity. This activity is a polygraph game that I created for students to practice describing all of the transformations they learned so far (reflections, translations, dilations). Students played this game for about 10-15 minutes at the end of class. Students LOVE polygraph. I literally had to kick students out of my class because they didn’t want to leave.

Some student comments I heard today were….

“Class is over already? I don’t want to go to my next class!”

“I love this! Can we do this more often?”

“This is so much fun”

I love polygraph because students were talking mathematically, getting excited about math, and I could see all of the questions they were asking eachother. Although I don’t always play polygraph in class, my typical class consist of a PearDeck presentation and depending the lesson, a Desmos Activity. Screen Shot 2016-02-04 at 7.38.58 PM

Feel free to checkout my past Peardeck presentations and Desmos Activities and reach out if you have any questions.