Grading made easy with Desmos Activity builder

In my geometry class, I have been using Desmos Activity builder to teach finding points of concurrency algebraically. In order to assess my students on this unit, I decided to create a Desmos Activity. I also created a packet that had the same questions that were on my Desmos Activity for students to use to show their work. I like using Desmos because it allowed my students to check their answers easily by entering thier equations or coordinates. I can ask questions that don’t involve graphing, and it easily organizes students answers. It also made grading SUPER EASY.

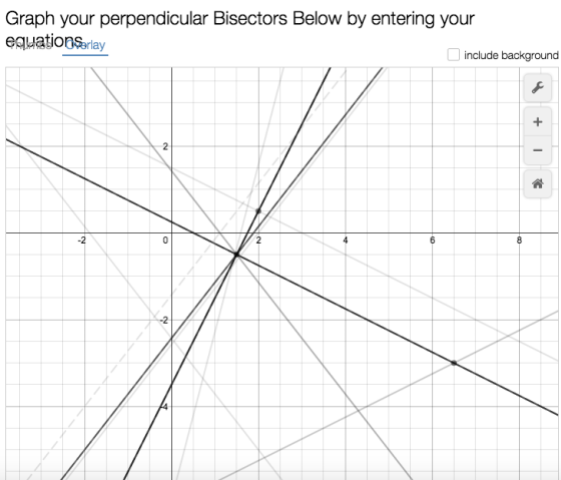
When grading with Desmos you can either grade one student at a time by clicking on their name OR you can grade one  question at a time. I decided to grade one question at a time. Because each students answers showed up at once for each problem I could quickly see which students answered incorrectly. You can also overlay all of the graphs to check students anwers quickly. If no students answered incorrectly I can see that immedietly.

In order to grade most efficiently, I created a grading grid (I usually use this to record homwork) with every student in the class’ name. Instead of putting the date at the top like I usually do, I put the Desmos slide number, the packet question number, and the amount of points each question was worth. I used this grading grid to grade this assessment. If student got the question correct I put a check in the box, if the student made a small mistake (and I could tell what they did from the answer) I would put minus the amount of points they’d lose for that question in the box. If I couldn’t figure out their mistake from their answer then I would write “check” in the box. When I finished grading all of the questions I would go through each students test. I ONLY looked at the problems where I wrote “check”.  I use erasable pens when grading, so after I checked their work I could go back and change the grade in the box easily.

This was an extremely long assessment and took NO time to grade. Using Desmos  for a quick quiz would be even easier! This was my first time using desmos for an assessment, but I’m definetly going to use it again!

Screen Shot 2015-12-21 at 3.53.43 PM

Review Day with QR code Stations…Points of Concurrency!

Today was my first time really using QR codes in class. So far in class students have found the circumcenter, orthocenter, and centroid separately, but never on the same triangle. In order to review for our test, I wanted students to practice finding points of concurrency, but I also didn’t want them calling me over every minute asking if their equations were correct.

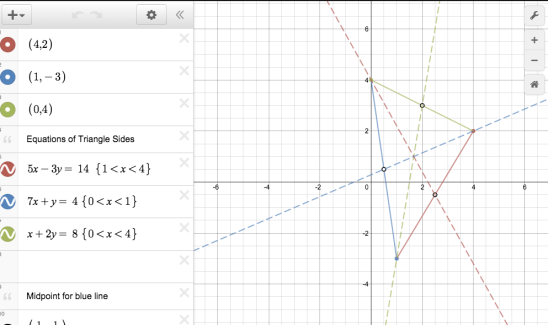
I created three stations, one for each point of concurrency. However, I didn’t write what point of concurrency they were finding. Each sheet started with a part 1. In part 1, students had to find the equations of the sides of triangle, given the three points. No matter what station the student started at they only had to do part 1 ONCE. Students were then given instructions on what I wanted them to do. Each station was a different color and told students to keep track of their colors. When they finished the directions they would scan the QR code and it would take them to a Desmos graph of their specific station. I had the graph organized and labeled and in the order of which they found the information. When students got a difference answer than me this made the process of figuring out where they went wrong. Questions like… did you have the same midpoints, did you have the same slope, are your equations the same… really helped them and myself pinpoint where they were making the most mistakes. Students had to find where the point of concurrency was located in every station and then tell me which point they found. I liked this part because it had them go back and reflect on the process.

In my first class of the day, I only gave each station the instructions and told them to show their work. For the second class, I made an organizer for each station. Step 1 had its own page because that was the same no matter what station they started at. I asked my students if they felt the organizer was helpful. They told me that it was confusing at first, but they felt that it helped them keep their equations organized and that it was a good tool to help them study. I’m definitely making changes to it for next year, but here it is if you want to check it out!

Also here are my Desmos graphs for the circumcenter, orthocenter and centroid answers!


Linear Functions Practice with Stations

My algebra 1 class only has 11 students who all work at very different paces. I don’t really like doing traditional stations because they tend to talk and not do their work, especially if the answers are at their table.  I arranged this activity based off of math sprints from I love Math. I changed the activity to focus on everything we’ve focused on this unit.

Each student started off with sheet #1. . I had all of the answers for all four sheets glued on the inside of a folder that I kept upfront with me. When students finished the first sheet they came to me to check their answers. When they got one incorrect I would circle it and send them back to their seats.  When students came to me with a completed and correct sheet they were able to get the next sheet.  I personally thought the sheets became slightly harder as class went on.

Because students were checking their answers with me, I was able to see what each student understood and how they improved throughout the class.Because every student worked at their own pace I was able to help every student. I was also able to see what the class as a whole was struggling on. I’m not sure how this would work in a  larger class, but in my class of 11 very hyperactive students it was perfect! They loved getting to move around and get instant feedback on their work.

At the end of class I had them staple all four sheets together and told them this was their Linear Equation Book (so far). I’ve found that they also love having practice problems and notes all in one place (the more compact the better). I teach very interactive, so students tend not to take detailed notes in my class. I’d rather them be engaged all during class and have this small book of practice problems to refresh their memories.

Their linear equation books include. . .

Sheet #1: Finding slope between two coordinate points

Sheet #2: Graphing Linear Equations

Sheet #3: Finding the equation of a line when given a graph

Sheet #4: Finding Equations of Lines given two coordinate points

I taught students how to find equations of lines given two coordinate points during the beginning of class using a Writing an Equation from 2 Points Template from the Algebra Toolbox Blog. Every student had a template in a sheet protector and a dry erase marker. We did a few together and I walked them through the template. I then put coordinates on the board and had students create equations by themselves.  After every equation, we would check them! My students love to compete against each other so they would race to see who finished first. They love the template, but it’s been difficult weaning them off of it. I plan to have them journal quickly at the beginning of class about what they are actually doing in the template to gage their understanding.

Teaching Points of Concurrency Algebraically using white boarding, Peardeck and Desmos Activities!

Let me just start off by saying I LOVE Desmos Activity Builder. I’ve used already made ones for my algebra 1 class, but I decided to make my own for this unit in geometry. We just finished up our proving triangle congruence unit and started talking about points of concurrency. My students were introduced to the points of concurrency in our construction unit, but now we were learning how to find them algebraically.  Also if you click on the links it will take you directly to my activities for Desmos and Peardeck!

Day 1 ( 90 minute )

I’ve thrown in algebra concepts all year through weekly problem sets using Delta Math. They did a lot of practice identifying slopes of lines and perpendicular lines by looking at an equation in standard form. So the first day was a refresher of identifying slope in standard form, and writing equations in standard form when given only the slope. We also practiced finding slope and then putting it into stardard form and solving for c.

I do a lot of partner white boarding in my class to do practice problems. In parter white boarding each table of two has 1 white board and one marker.  Partners have to work together and talk about the problem to complete it. This also gives me a great chance to walk around and help students who are struggling.  Students practiced finding equations of lines in standard form when given two points. I embedded a desmos link into my peardeck so students could check their answers with their partner. Students also practiced finding perpendicular lines.

The last problem of the class asked students to plot three coordinate points in their peardeck. My students were confused at first on why I was having them graph three points. Students quickly noticed that the three points create a triangle. With their partners students worked together to find the equations of the lines of the triangle and the perpendicular bisector of each side. I didn’t introduce that the point of intersection was  the circumcenter quite yet.

When I do this next year I would give them more time to practice writing equations of lines in standard form and introduce perpendicular bisectors the next day. Here is a link to my PearDeck for Day 1.

Screen Shot 2015-12-04 at 4.36.17 PM

Day 2 (55 min) 

Day 2 started with my students checking their homework. I ususally have my homework answers in a google doc that I embed in my peardeck. This allows students to check their homework as soon as they walk in, and have the answers on their computer so they can check at their own pace.

On the next slide, I had a link embedded  student.desmos.com, so they were directly taken to the next activity. I gave them the code to start their Desmos Activity. This is the first Desmos Activity that I created! It was awesome. I also had the activity (and my peardeck) pulled up on my ipad. This allows me see all of my students work while I walked around the classroom. I could also control my Peardeck through my Ipad, so I can control my slides and be anywhere in the room.

This Desmos Activity focused on finding perpendicular bisectors on every side of the triangle and discussed how they were finding the circumcenter of the triangle. At the end of the activity students were asked to check their equations again mine and then they imedietely were taken back to PearDeck. Then on Peardeck we received solving systems of equations to find where our circumcenter is located. I really wanted my students to nail down another form besides slope-intercept and solve systems other than substitution, so I had my students keep their equations in standard form and solve systems only using elimination. It was challenging at first, but my started are really starting to understand using standard form.

Day 3

Day three started the same way with students checking their homework on peardeck and answering homework questions. Day 3 was focused on finding the centroid. We worked on finding the midpoints and I had them check their midpoints compared to mine before moving on. Then I introduced creating medians from the midpoint to the opposite vertex. Student’s were able to practice with their partners and then were able to check their answers on the embedded Desmos.

Day 4

Day 4 was probably my favorite day. After checking homework and answering questions, I briefly introduced how to find the orthocenter via peardeck and then sent students to a desmos activity. This activity scaffoled the entire proccess. Students were able to go through each step and check their work against mine on each slide. Here is a link to my Desmos Activity!

I really like the activity builder for finding points of concurrency algebraically because students can check their work by graphing, can work at their own pace, and I can see their classwork during and after class! Although tricky, students are really grasping writing equations in standard form and finding the different points of concurrency. I loved this unit. It’s so fun to see how geometric shapes work algebraically !