
When I started my factoring unit, I was definitely a little worried. I’ve seen factoring taught a ton of different ways by using short cuts, but my students have never seemed to remember the “tricks” once the unit was over. They never truly understood what they were actually doing when they were factoring a quadratic or why they would factor.
Although I’ve never taught factoring entirely this way before, I decided to teach it only using the box method.
Day 1
I started the unit by teaching double distribution. Instead of using “FOIL” of the “arrows” I decided to teach dd by discussing area. I drew four boxes all  connected on the board and wrote two numbers on the top of the boxes and two numbers going down the left side of the boxes. I told my class that each box what a piece of land and asked how I could find the total area of all the land.
“Easy! F ind the area of each piece of land and then add them together!”
Next instead of using all constants, I added in variables. They were then multiplying (x+5)(x
They were then multiplying (x+5)(x+6) and (2x+5)(3x+5) and (3x^2 +3x +3) (x+5) no problem. I had them notice that like terms were ALWAYS on the diagonal. For every problem, I had them circle the like terms on the diagonal.
Day 2
I started out class by having students multiply (x+5)(x+2) using their boxes. Once combining like terms, they got x^2 +7x +10 as their “area”. Next, I posed the questions of “what if you were given the area to start… how would you find the dimensions of each piece of land”. They knew that x^2 went into the first box and 10 went into the last box on the right, but we were unsure on how we could 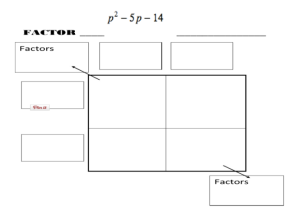 break up the diagonal. They KNEW that the diagonal had to add to 7x. But how do we break this up?!!!
We first decided to focus on the area we knew. We KNEW that x^2 only factored into x and x. We then decided to look at the factors of 10. So we had (10,1) (2,5) and thought as a class “DO any of these add up to 7?!!” YES! We then put 2 and 5 as the dimensions and multiplied to see if it worked.
I gave out a template the had a box already created and a space to write the factors of the first and last term. On the diagonal of the box, there is a circle. This circles purpose was to visualize combining like terms. To check to make sure they added up to the correct number. I put each of these templates in a page protector. This way they could use a dry erase marker and easily erase if they made a mistake. During this class period, we practiced factoring terms where a=1 and had my students get into the habit of writing all of the factors of the first and last terms in order to get in the habit for when we started quadratics of a>1.
I was so impressed how FAST my students learned factoring. It actually made sense to them! Factoring the difference of perfect squares even came easy to them because they knew their diagonal had to add to be zero!!
Day 3
Factoring terms where a>1.. This is where the box method takes a little more time. However, I’d rather it take longer and have the students understand what they are doing than have them memorize a process. Went through the same thing we did the day before with filling in our boxes and listing our factors. From here I told them they would have to “guess and check” their different factors. This is where having their templates came into great use. They could check all of their factors and if it didn’t they wouldn’t have to redo everything.

My students loved how visual the boxes were. They also saw factoring as a puzzle and had a lot of fun with it. I did a few days of practice with whiteboarding and scavenger hunts and did a 15-minute review before the test. Out of my 9 students who took the quiz 5 of them got 100%. This NEVER happens in this class. This quiz included multiplying binomials, factoring a=1 and a>1 and perfect squares!
Things I would change
- Practice more with finding the factors of numbers.
- I want to create problems in my boxes and list the factors of the first and last term and add the like terms to a number that’s given to them already in the box before we start a>1. Then I would have them create the factors and add to that number. AND then introduce factoring for a>1
- Spend more time on GCF.


