Volume of 3D Shapes with Play-Doh and Water

I love when my students are engaged and visually learning.  After Julie Reulbach told me about how she used Play-doh to create 3D shapes with her students, I decided to try it out. I had students work in groups of two to create 3D shapes.

Supplies per group:

  • One fun-sized Play-doh
  • Ruler
  • Plastic knife

Students were given the following instructions

  1. Create a square prism
  2.  Using your ruler, cut your shape into 1 cm pieces. Cut it away that all of your pieces are the same shape. Specify that you can only cut once to make the shape.
  3. Next, we discussed finding the area of one piece and then multiplying it by the number of pieces to find the volume. They realized that the number of pieces their prism was cut into was the “height”.

We repeated this with a triangular prism and cylinder. Students came up with the formula that volume= area base*height.

Next, I had students create a cone and asked them to cut it into identical shapes. They realized they couldn’t. I wish that I had 3D solids at this point in class (I got some later), but I did the next best think by showing them a video.

I first started out by asking if they thought a cone could relate to any of the other shapes we’ve talked about. A cylinder quickly became the winner because they both of circular bases. I then asked how much bigger did they think the cylinder was compared to the cone. After taking classroom bets we watched a video using corn kernels from a cylinder to fill up 3 cones. This helped us derive the equation for the volume of a cone.  We did this same thing for finding the formula for a pyramid.

This play-doh activity really helped my students visualize the formulas and understand that the height of the pyramid didn’t always go from top to bottom. We described the heigIMG_7787ht as the direction we’d slice the shape to create congruent shapes.

The next day, I did have 3D solids and set of stations around the room.

Station 1: Cone and Cylinders

Station 2: Triangular and Square Pyramids and their prisms.

Stations 3: Octagonal Pyramid and Octagonal Prism.

Station 4: Half Sphere and Cylinder

For stations 1-3, I had students first find the volume of the shapes algebraically. They then fill up the shapes with water and measured the volume of the water using graduated cylinders. They loved seeing their math match up (close enough). This also gave us a chance to talk about percent error (spilling water).

IMG_7791For station 3, I first had them fill up the half sphere with water and measured the water with the graduated cylinder. Next, they had to figure out how many half spheres it took to fill up their cylinder. The cylinder was the same height of the half sphere.

It was then up to the students to derive the formula for a half sphere, then a full sphere. The hardest part for them was making the connection that the height was also the radius.

I loved these water stations. Students got to visualize the formulas for the second time, they got to practice finding volume, and they got to derive the formula for a sphere.

After class, I asked my students if they would have liked doing the water activity on the first day. They told me they liked doing the water later in the lesson because they had a day to let the play-doh formulas sink in and they could reaffirm what they knew and discovered something new.

Create Your Own Word Problems: Solving Systems Stations

I want to start off by saying how proud I am of my students by the effort they put into this activity. My algebra 1 class can sometimes be hectic, and can be difficult to have the entire class focused and motivated to work. IMG_7241

I started my solving systems of linear equations unit with word problems. I really wanted my students to understand the context behind solving systems of equations.

One the first day, we just practiced forming equations from word problems. I saw a blog post, after I started this unit, about numberless word problems. Next time I teach this, I want to start using numberless word problems and move on from there.

We then used word problems to learn solving systems by graphing, and my substitution. We are moving on to world problems with elimination this week.

We just had a four day weekend, and  I wanted to refresh the substitution method before we moved on.

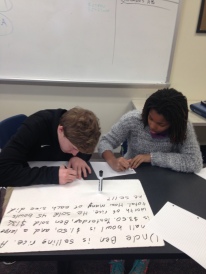
I had every student work with a partner and each pair had a whiteboard. I gave the following directions:

  • Create a word problem on your whiteboard. Make sure you can create two linear equations from your world problem.

IMG_7249

  • After you create your word problem, raise your hands for more directions
    • Some students had difficulty making their world problems. They’d call me over and I’d remind them of the information they needed to add by asking questions about what else they’d need to know in order to solve the problem.
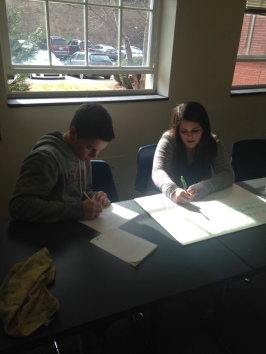
  • After their word problem was approved, I then gave them folded piece of paper. On the inside of the paper, they were to define their variables, create and then solve their equations.
    IMG_7246

    • During this time I had plenty of time to walk around the classroom and answer questions. I also check each group’s work on the problem.
  • Once every student was finished, I put line pieces of paper next to each whiteboard. Each whiteboard was now a station and the students created the answer keys for their OWN problems.
    • I think it is important for students to create and work their OWN problems. It gives them a type of ownership and it helps them realize what information needs to be included. They also love putting their peers names in their word problems. It makes going around to each problem a little fun.

This was an awesome wrap-up activity. It was simple, but it required students to work together, create their own problems,  ask questions, and solve their peers work. Students also created ALL of the PROBLEMS and the ANSWERS! This required no prep!  It also gave me time to really work with students who were still strugglings.

Scavenger Hunt Stations

I love using stations to review for a quiz or test. I have done many stations using folders and QR codes, but I found that my students like to work with the same people and tend to get the question from the station and go back to their usual seat. This time, I decided to change it up.

I created 7 stations and printed out two copies of each station. I laminated and then taped these stations all around the room. I also created a worksheet for my students that provided room for them to show their work for each. However, the worksheet did not provide any of the questions, so students had to stay at the stations to see and answer all of the questions.

Although there were only 7 sets of problems, I doubled them to create 14 stations. The maximum number of students I have in my classes is 20, so this ensured that there would be no more than 2 students at a particular station. I really liked this because it allowed my students to work with partners, but not in large groups. Students were also moving around the entire time! Some students did take pictures of the questions and went back to their seats… ugh… but most students stayed at their station. Because I had the stations taped to the walls (and one in the middle) I could see every student working. I could also see which students were struggling. It was also entertaining watching my students search for the stations they needed!

I used these stations to review for a quiz on special quadrilaterals and interior and exterior sums of polygons. Each station dealt with a different type of question that they would be assessed on. Overall, this was a pretty fun and successful review activity.

Here is the stations worksheet and stations that I used for this activity! Here is also my answer key.

Also, for station 1, I created a polygon and attached strings to one vertex and had students create the diagonals with the strings (you cant see what it is from my stations sheet) !


Review Day with QR code Stations…Points of Concurrency!

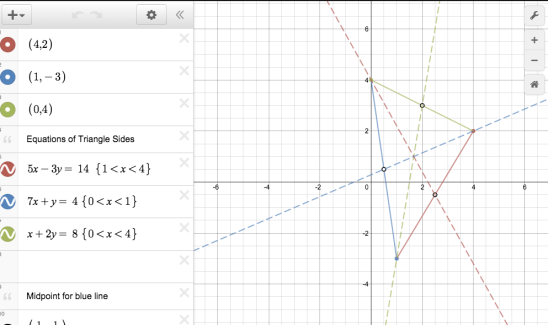
Today was my first time really using QR codes in class. So far in class students have found the circumcenter, orthocenter, and centroid separately, but never on the same triangle. In order to review for our test, I wanted students to practice finding points of concurrency, but I also didn’t want them calling me over every minute asking if their equations were correct.

I created three stations, one for each point of concurrency. However, I didn’t write what point of concurrency they were finding. Each sheet started with a part 1. In part 1, students had to find the equations of the sides of triangle, given the three points. No matter what station the student started at they only had to do part 1 ONCE. Students were then given instructions on what I wanted them to do. Each station was a different color and told students to keep track of their colors. When they finished the directions they would scan the QR code and it would take them to a Desmos graph of their specific station. I had the graph organized and labeled and in the order of which they found the information. When students got a difference answer than me this made the process of figuring out where they went wrong. Questions like… did you have the same midpoints, did you have the same slope, are your equations the same… really helped them and myself pinpoint where they were making the most mistakes. Students had to find where the point of concurrency was located in every station and then tell me which point they found. I liked this part because it had them go back and reflect on the process.

In my first class of the day, I only gave each station the instructions and told them to show their work. For the second class, I made an organizer for each station. Step 1 had its own page because that was the same no matter what station they started at. I asked my students if they felt the organizer was helpful. They told me that it was confusing at first, but they felt that it helped them keep their equations organized and that it was a good tool to help them study. I’m definitely making changes to it for next year, but here it is if you want to check it out!

Also here are my Desmos graphs for the circumcenter, orthocenter and centroid answers!


Linear Functions Practice with Stations

My algebra 1 class only has 11 students who all work at very different paces. I don’t really like doing traditional stations because they tend to talk and not do their work, especially if the answers are at their table.  I arranged this activity based off of math sprints from I love Math. I changed the activity to focus on everything we’ve focused on this unit.

Each student started off with sheet #1. . I had all of the answers for all four sheets glued on the inside of a folder that I kept upfront with me. When students finished the first sheet they came to me to check their answers. When they got one incorrect I would circle it and send them back to their seats.  When students came to me with a completed and correct sheet they were able to get the next sheet.  I personally thought the sheets became slightly harder as class went on.

Because students were checking their answers with me, I was able to see what each student understood and how they improved throughout the class.Because every student worked at their own pace I was able to help every student. I was also able to see what the class as a whole was struggling on. I’m not sure how this would work in a  larger class, but in my class of 11 very hyperactive students it was perfect! They loved getting to move around and get instant feedback on their work.

At the end of class I had them staple all four sheets together and told them this was their Linear Equation Book (so far). I’ve found that they also love having practice problems and notes all in one place (the more compact the better). I teach very interactive, so students tend not to take detailed notes in my class. I’d rather them be engaged all during class and have this small book of practice problems to refresh their memories.

Their linear equation books include. . .

Sheet #1: Finding slope between two coordinate points

Sheet #2: Graphing Linear Equations

Sheet #3: Finding the equation of a line when given a graph

Sheet #4: Finding Equations of Lines given two coordinate points

I taught students how to find equations of lines given two coordinate points during the beginning of class using a Writing an Equation from 2 Points Template from the Algebra Toolbox Blog. Every student had a template in a sheet protector and a dry erase marker. We did a few together and I walked them through the template. I then put coordinates on the board and had students create equations by themselves.  After every equation, we would check them! My students love to compete against each other so they would race to see who finished first. They love the template, but it’s been difficult weaning them off of it. I plan to have them journal quickly at the beginning of class about what they are actually doing in the template to gage their understanding.