Teaching Parallel Line Proofs: Student-Paced

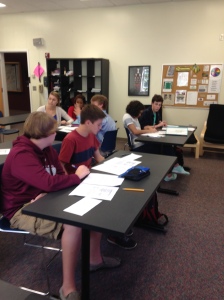
This year, I have been trying to make my classes mostly student-paced. It really helps differentiate and allows me to answer questions all class.

I started my unit for Parallel Line proofs by exploring parallel and perpendicular lines algebraically. In my geometry course, we explore the geometric and algebraic aspects of almost every unit.

Day 1 : The Desmos activity I created for this unit explored standard, slope-intercept, and transformation (vertex) form. Students also explored what it means algebraically for lines to be parallel or perpendicular. My students have books/workbooks that I put together for each unit that includes guided notes and homework. This activity followed along with the pages below. At the end of class, we pop-corned around the class and discussed the pros and cons of each form.


Day 2: We started looking at parallel lines geometrically, and the angle relationships formed by parallel lines being cut by a transversal. During this class, I used Peardeck and embedded a Geogebra Activity for students to explore angle relationships. The worksheet that went along with the activity went here.  This was a 95-minute class,  so once we finished we practiced labeling out dance boards and played dance dance transversal! 


Day 3: Parallelogram Mazes. I used this last year too. I love it. It gets students really thinking about angle relationships and how you can “jump” from one angle and end at another. I called it “Parallel Line Land” in class.


Day 4: Now it was time to introduce parallel line proofs. I decided to make this class almost entirely student-paced and create it using Desmos Activity building. I was able to scaffold proof building in this activity.  I had students copy the proofs they did on Desmos  ALSO in their notes. desmos
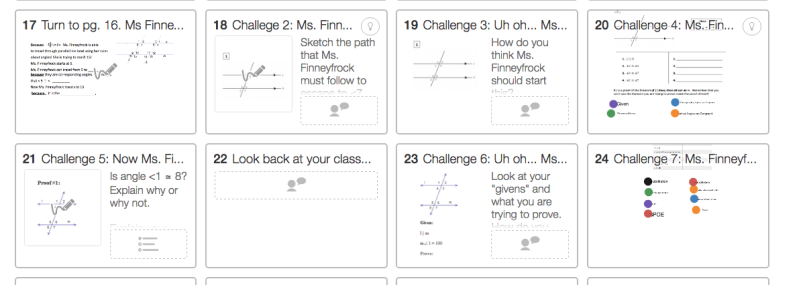
 

Day 5: Proof practice. Today we used a Desmos Activity and Whiteboarding. This Desmos Activity has student walked through a scaffolded proof of their own, and then they work with their partner on a proof on their whiteboard. I had students walk around and see how/if other groups proved it differently.  Students also created their own “parallel Line land” together and decided what they wanted to prove. They then created their own proof.


Day 6: I created a Desmos Activity that walks students through proving lines are parallel.  It scaffolded the proof process and goes through all of the converse theorems. I utilized the Desmos Pause button a lot during this activity! It gave us the opportunity for a lot of great discussions!


Day 7/8: Review-  On day 7: I gave each student a different proof (there were 10 so I split them up evenly). It was the student’s job to become an expert on the one problem. They  had to create a video explaining how they proved it and upload it onto Seesaw. Instead of adding each student’s name to Seesaw, I grouped everything by problem number. Students uploaded their video to whatever number they became an expert at! By the end of the day, each problem had about 4-6 videos. On day 8, students completed all the proofs! They could call over the “expert” for help or watch the videos! It was a great way to help them study for the test!

Socratic Seminar in Geometry!

After attending Mattie and Chris‘ morning session at Twitter Math Camp, I really wanted to try and get students talking more in class. One idea (of many) that really stuck with me was doing a Socratic (Paideia) Seminar in my geometry class.   After talking to Mattie at lunch, I decided that doing it as an introduction to proofs was a great place for it.

Geometry is typically taught using two-column proofs. However, I wanted my students to be knowledgeable about all formats of proofs  and make the decision for themselves. Every format speaks to students differently, so I wanted to give them the autonomy to decide.

Every unit, my students receive a new booklet from me. This booklet includes all of the material they need for the unit and acts as their textbook. The first activity for this unit was proof exploration.  Students had to examine two-column proofs, paragraph proofs, and flow-chart proofs (these were given to them) and find one other source about proofs. In order to prepare for the seminar, students had show they activity read.

Ways  to show you actively read:

  • Highlight
  • Notes in the margins
  • Questions in the margins
  • Answer all questions

Students filled out the pages below before coming to class for the seminar. If you are interested in seeing the entire booklet, it can be found here. unit-3-introduction-to-proofs

This slideshow requires JavaScript.

When students arrived to class, I had the class organized in two circles. The outer circle had tables and the inner circle only had chairs. I assigned students their “circles” and then asked them to take out their notebooks and computers.

The inner circle could use only their notebooks during the seminar. The outer circle would be on their computers. I used PowerSchool for students to “backchannel” during the seminar. On this “backchannel” students could engage in conversation with the rest of outer circle about the conversation going on in the middle circle. They could also talk about anything else as long it revolved around the subject. Many students chose to answer the questions being asked to the inner circle, and agreeing or disagreeing with comments being made.

Before we started, we went over the rules for each circle.


It was amazing how much students were talking and engaged in the activity. I heard very insightful comments from all ranges of students.  A lot of my students actually asked for deeper questions for next time (I went easy on them).  They said they had a deeper understanding of parts of proofs and why different parts needed to be included. They all also picked their favorite style of proof which they are allowed to use the entire year.

We look turns switching the circles as well! Below are some the questions that my students were asked. I did not reach the questions out loud. I just added a question when signaled by the students.

This slideshow requires JavaScript.

A video of part of our seminar can be found here! 


Survival Guide for Proving Triangle Congruence

I am constantly AMAZED on how create my students are.  I occasionally try and throw in an assessment that is NOT a test because I have a lot of students who don’t test well.  We just finished up our unit on proving triangle congruence, and I decided that my students would make a proof survival guide for their assessment. I gave them two and a half class periods (the same amount of time I would have spent reviewing and testing)  to work on the project. Many students also worked on it over the weekend and at home.

  • Introduction:
    • Provide a table of contents.
    • Introduce your project. Talk about your experience with proofs (if you like them, dislike them, easy, hard).
    • Discuss what you are going to talk about in your guide.
  • Model Proofs (with helpful hints)
    • Prove triangle congruence by the following.
      • SSS
      • SAS
      • ASA
      • AAS
      • CPCTC
    • For the “helpful hints” students had to provide an insight into their thought process when solving proofs. If someone was trying to solve their proof what type of things would they have to think about?
  • Practice Problems
    • Students had to provide 5 practice problems  for proving triangle congruence. Students also had to provide an answer key for the practice problems.
  • What doesn’t work?!
    • In this section, students had to explain what pieces of information wouldn’t work for proving triangle congruence (SSA and AAA). They were required to provide pictures to help their explanation.
  • Triangles in the Real world
    • Students had to research where triangles were used in the real world. They also had to research which type of jobs would require knowing properties of triangles and triangles congruence.
  • Conclusion/Reflection
    • In this section, students had to provide a thoughtful reflection about the proof process and their project.

I provided my students with these guidelines and also a grading rubric with my expectations. They could present their survival guide in any way they wanted to. I provided poster board, markers, and construction paper during class. A bunch of students created their project on Keynote, pages, and powerpoint. Others created their survival guide in a small notebook, huge poster, FBI secret files, scrapbook pages, and many more!! I’m always so impressed when I have students do projects. I love giving my students the autonomy on assessments. Even the small the choice of choosing how they want to present it inspires so much creativity that I normally don’t see in the classroom!

Below are pictures of a few of the projects and here is my rubric and guidelines for the project! Let me know if you have any questions!


Making Math Stations Easy By Using Folders!

In Geometry, we have been working on even/odd proofs. Some students were picking it up extremely quickly, but others were struggling (mostly over thinking everything)! I wanted to create an activity where students were able to work at their own pace to practice even/odd proofs. I decided that I would try out creating stations. I created 9 even/odd proofs ranging in levels of difficulty. I allowed my students to work with a partner and use their notes from our class before.

I started class by handing everyone proof #1 and a list of algebraic properties and explained the rules of the day.

  1. Work through proof #1with your partner. If you get stuck look at the examples in your notes. If you still don’t understand call me over for help.
  2. When you finish find the folder with the same color as your proof labeled “#1” Open the folder and check your answers. If it doesn’t match up where did your proof go wrong?
  3. Once proof #1 is perfected find the folder labeled #2. Paper clipped to this folder is your sheet for Proof #2. Go back to your seat to complete it.
  4. Repeat until finished Proof #9.
  5. When finished turn your proofs into a “proof book”
  6. ALL proofs must be completed before class tomorrow.

This activity was GREAT. It took a lot of prep, but students were able to check their proofs right away and work at their own place. Some students finished all of the proofs in class while others still had a few left. The ones who finished in class walked around and helped students who were struggling. For the students who did not finish had to complete the proofs for homework. I posted the answers to the proofs online, so my students could check their answers. Each proof was written in a different color, so it was easy to decipher which proof students were struggling with. It also made for a colorful booklet 🙂

These stations were great! They weren’t the typical stations where students rotated from table to table to switch problems, but I think they really enjoyed getting up to check their answers and grab the next problem. I liked having  them work with a partner because they wouldn’t move on to the next proof until both of them understood it.  Although this required a lot of prep, I had to do very little in class. Students were extremely very self-directed and only called me over to ask specific questions. These were questions that they were not able to figure out from their notes the day before. Once students started finishing up and started helping their peers this also decreased my involvement with my students.  By having the answers in the folders the question of “is this right?!” was completed eliminated. This gave me time to walk around and answer essential questions and figure out which students were struggling.

I LOVED using folders for stations. I’ve had students in Algebra 1 make their own stations with folders and worked beautifully. Having a problem on the front of the folder and the answers and work on the inside eliminate the teachers work of having to discuss every single problem. I also liked the folders for stations because it gave students instant feedback and a created a place to keep the papers for each problem.  If you do math stations of any kind I highly recommend using folders! The classroom felt so alive, students could work at their own pace, receive instant feedback, and ask questions!

IMG_6165 IMG_6166 IMG_6168 IMG_6169 IMG_6171 IMG_6173 IMG_6175 IMG_6176 IMG_6177