Socratic Seminars for Math Review

We are preparing for midterms, and for my Algebra 2 class, I decided to do a Socratic Seminar to review the all of the material. Instead of giving my students a list of topics that would be on the midterm, they created their own list by looking through their notes and tests and discussing the past semester. screen-shot-2016-12-10-at-11-31-42-am

My students were set up into two circles. Students on the inside circle had to discuss the questions prompted on the board. All students on the inside circle had to talk once before anyone else in the circle could speak again. This had all students looking through their notes and past test and participating in the review. They were coming up with what was important anscreen-shot-2016-12-10-at-11-32-00-amd narrowed down the topics that they struggled with the most. I added in a few questions in verbally when I felt they got stuck or could push the topic further.

Being able to verbalize the concepts they needed to know and the concepts they needed to work was extremely helpful for my students.

While the inside circle was discussing the prompted questions, the screen-shot-2016-12-10-at-11-32-58-amoutside circle was discussing the questions on a back channel chat. They were writing down the topics that they needed to know/work-on and went into more detail about the concepts than the inner circle.

For backchanneling, I have used

They both work really well and are extremely teacher/student friendly.

For this seminar, I used Today’s Meet. If you would like to embed your backchannel into your class page, it is extremely easy. By clicking class tooscreen-shot-2016-12-10-at-11-33-37-amls at the bottom of your chat, it allows you embed the live stream or transcript to your page.

This back channel chat was embedded “live stream” into their Haiku page, so it was easy to get to and they can refer back to it to study.

screen-shot-2016-12-10-at-11-31-33-amFor this seminar, I had students switch circles for every chapter. I asked the same questions for each chapter. I had questions appear one at a time.

I love doing Socratic seminars in my classes.  Talking about concepts and explaining them to their peers really helps students truly understand the concept. This activity also had them reflect on everything they learned this year. I think reflecting on their past test, instead of just looking at them, was also really beneficial.

A video of my seminar can be found here. 

I would love to hear if you have any suggestions or ways to improve and use Socratic Seminars. I also love trying new back channeling sites, if you have tried one that works well I would love to hear about it!

Teaching Parallel Line Proofs: Student-Paced

This year, I have been trying to make my classes mostly student-paced. It really helps differentiate and allows me to answer questions all class.

I started my unit for Parallel Line proofs by exploring parallel and perpendicular lines algebraically. In my geometry course, we explore the geometric and algebraic aspects of almost every unit.

Day 1 : The Desmos activity I created for this unit explored standard, slope-intercept, and transformation (vertex) form. Students also explored what it means algebraically for lines to be parallel or perpendicular. My students have books/workbooks that I put together for each unit that includes guided notes and homework. This activity followed along with the pages below. At the end of class, we pop-corned around the class and discussed the pros and cons of each form.


Day 2: We started looking at parallel lines geometrically, and the angle relationships formed by parallel lines being cut by a transversal. During this class, I used Peardeck and embedded a Geogebra Activity for students to explore angle relationships. The worksheet that went along with the activity went here.  This was a 95-minute class,  so once we finished we practiced labeling out dance boards and played dance dance transversal! 


Day 3: Parallelogram Mazes. I used this last year too. I love it. It gets students really thinking about angle relationships and how you can “jump” from one angle and end at another. I called it “Parallel Line Land” in class.


Day 4: Now it was time to introduce parallel line proofs. I decided to make this class almost entirely student-paced and create it using Desmos Activity building. I was able to scaffold proof building in this activity.  I had students copy the proofs they did on Desmos  ALSO in their notes. desmos


Day 5: Proof practice. Today we used a Desmos Activity and Whiteboarding. This Desmos Activity has student walked through a scaffolded proof of their own, and then they work with their partner on a proof on their whiteboard. I had students walk around and see how/if other groups proved it differently.  Students also created their own “parallel Line land” together and decided what they wanted to prove. They then created their own proof.


Day 6: I created a Desmos Activity that walks students through proving lines are parallel.  It scaffolded the proof process and goes through all of the converse theorems. I utilized the Desmos Pause button a lot during this activity! It gave us the opportunity for a lot of great discussions!


Day 7/8: Review-  On day 7: I gave each student a different proof (there were 10 so I split them up evenly). It was the student’s job to become an expert on the one problem. They  had to create a video explaining how they proved it and upload it onto Seesaw. Instead of adding each student’s name to Seesaw, I grouped everything by problem number. Students uploaded their video to whatever number they became an expert at! By the end of the day, each problem had about 4-6 videos. On day 8, students completed all the proofs! They could call over the “expert” for help or watch the videos! It was a great way to help them study for the test!

Socratic Seminar in Geometry!

After attending Mattie and Chris‘ morning session at Twitter Math Camp, I really wanted to try and get students talking more in class. One idea (of many) that really stuck with me was doing a Socratic (Paideia) Seminar in my geometry class.   After talking to Mattie at lunch, I decided that doing it as an introduction to proofs was a great place for it.

Geometry is typically taught using two-column proofs. However, I wanted my students to be knowledgeable about all formats of proofs  and make the decision for themselves. Every format speaks to students differently, so I wanted to give them the autonomy to decide.

Every unit, my students receive a new booklet from me. This booklet includes all of the material they need for the unit and acts as their textbook. The first activity for this unit was proof exploration.  Students had to examine two-column proofs, paragraph proofs, and flow-chart proofs (these were given to them) and find one other source about proofs. In order to prepare for the seminar, students had show they activity read.

Ways  to show you actively read:

  • Highlight
  • Notes in the margins
  • Questions in the margins
  • Answer all questions

Students filled out the pages below before coming to class for the seminar. If you are interested in seeing the entire booklet, it can be found here. unit-3-introduction-to-proofs

This slideshow requires JavaScript.

When students arrived to class, I had the class organized in two circles. The outer circle had tables and the inner circle only had chairs. I assigned students their “circles” and then asked them to take out their notebooks and computers.

The inner circle could use only their notebooks during the seminar. The outer circle would be on their computers. I used PowerSchool for students to “backchannel” during the seminar. On this “backchannel” students could engage in conversation with the rest of outer circle about the conversation going on in the middle circle. They could also talk about anything else as long it revolved around the subject. Many students chose to answer the questions being asked to the inner circle, and agreeing or disagreeing with comments being made.

Before we started, we went over the rules for each circle.


It was amazing how much students were talking and engaged in the activity. I heard very insightful comments from all ranges of students.  A lot of my students actually asked for deeper questions for next time (I went easy on them).  They said they had a deeper understanding of parts of proofs and why different parts needed to be included. They all also picked their favorite style of proof which they are allowed to use the entire year.

We look turns switching the circles as well! Below are some the questions that my students were asked. I did not reach the questions out loud. I just added a question when signaled by the students.

This slideshow requires JavaScript.

A video of part of our seminar can be found here! 


More than a Worksheet… with Desmos!

Typically, I use Desmos Activities at the beginning or end of a lesson. I have found it as a great tool to introduce or wrap up a class. However, recently I have been using activity builder more in my classroom every day.  A new thing I have been doing is  pairing Desmos Activites with  worksheets.

Pros of pairing them together

  • Students are writing more!
    • After students complete one problem on their sheet, they follow along with the Desmos Activity until they are told to stop and move to the next problem.
    • Problems go more in depth after they solve it on their paper. Students are asked to explain their answers.
  • Students can check their answers.
    • Instead of being called over to ask if “they did it right” students can check their answers on their own and move at their own pace.
    • Students can also compare their answers with other students all around the room
  • You know how ALL of your students are doing at all times
    • You can see if they are doing it correctly all in one place. I’ll walk around with my iPad as I help students.
    • If you realize that a lot of students are struggling with a certain problem you can put the activity on teacher mode  and talk about it as a class.
  • You get immediate Feedback!
    • This is a great space to give an “exit ticket”, see where students are, and how you can help them!

Here is an example of a worksheet and the Desmos Activity that goes along with it about graphing and solving systems of equations.

This example is practice graphing systems of equations: Worksheet & Desmos Activity.

screen-shot-2016-09-26-at-8-13-24-pm

Logic Story Books

Students tend to struggle with symbolic logic.  It’s hard for them to see the order of the logical statements and the reasons behind it. They want to use the inverse or converse to prove something because it’s there. I feel like it’s hard for them to visualize why they can’t do it with symbols until they see why it doesn’t work elsewhere.

We had some time after a quiz on a long block day (85-minute class), and I decided to let their creative side show.

I asked the students to create a children’s book using logic statements.

  • They needed at least 10 statements
  • Create a story with fluidity by using the transitive property, contrapositive, and conditional of the statement at least once ( & identify when they used what)
  • I gave the students the story “If you give a Mouse a Cookie” as an example

This really helped especially with creative transitive statements. For some reason, they seem to struggle with identifying transitive statements when creating proofs.

I let students decide how they wanted to create the story. Some students created theirs on paper while others created it on power point, pages, or google docs. I wanted everyone to see the other stories, however, class time didn’t allow that.

I decided to utilize the wiki feature on Haiku, and I set up a wiki assignment where every student uploaded their story. For homework, student’s had to comment on at least 4 other stories from any of the three geometry classes. This has the same effect as a gallery walk with post-it notes, but it’s now archived on their Haiku. This was a fun activity that didn’t take up too much time. Students really enjoyed creating stories!


Create a Picture: Exploring Vocab and Geogebra

I love projects. From my observations last year, students seemed to get a lot out of applying their knowledge instead of taking a formal written assessment. After learning basic geometry vocabulary and briefly playing around with Geogebra for constructions, I created an art project for students to show me what they know.

crdbczlwyaamz-0

Feedback I received:

  • 15 words is a lot (agreed)
  • Some students said they would have liked it better if they didn’t have to use GeoGebra. Part of the assignment is learning the software, so that part is staying for next year.
  • Most students said that creating their pictures and having to write about what they did using the vocabulary really helped them visualize the vocab and apply it, instead of just memorizing

I also gave a quiz on the vocab after this project. Although this way a graded project, it was used as a way to enhance their learning, not just assess it. Below are some of the amazing projects I received. My students are so creative!!!  I also had my students do a gallery walk (each received 4 sticky notes but they asked for more) when the project was due. This gave them a chance to see other people in their classes work and made everyone feel good about their work 🙂


This slideshow requires JavaScript.


#ElonEd Chats Storify

We’ve had some great chats! #ElonEd Chats are open to all educators!

When?

Every other Sunday @ 8:30 PM Est.

Here are all of the archived chats in Storify if you missed them!


screen-shot-2017-02-15-at-7-53-06-am

Week 1: Creating a Culture of Math Discussions and Debates

Starting my second year of teaching.Thankfully, I had one prep that didn’t change, Geometry! I’m finally out of the “holding my head up right above the water so I don’t drown” year and am finally truly changing and analyzing my classes. This year I decided to have two main goals.

  1. I want my students to speak and debate mathematically
  2. I want my students to write mathematically

For this post, I’m going to focus on goal #1.  In my first week back, I created more mathematical discussion than I had the entire previous year.

At Twitter Math Camp this summer, I went to a morning session with Mattie Baker and Chris Luzniak  about creating a culture of mathematical discussion and debate. One of the many ways to do this was to set up a classroom environment is which students use the format

My claim is____________. My warrant is _____________  to express and justify their ideas.

I started using this format on the first day of class. I started asking fun questions like “what’s your favorite movie?” “where’s your favorite vacation spot” and some “would you rather” questions. This was a great way to help students become comfortable with the format, get comfortable with each other, and helped me learn their names very quickly. We continued with these same type of questions on day two.

Next, I started asking more mathematical questions, specifically for vocab that they were supposed to look up the night before for homework. I called on two or three students per vocab word to hear their opinions. If there was a controversial word, I asked more students for their thoughts.   This was a great way to go over and discuss vocab in an interactive way. I could also see what misconceptions they had of certain words.


Then I used this to explore a topic that we hadn’t really focused on yet. For homework, I had students look up the definition of congruent and equal and compare them. When they submitted their responses I could tell that there were misconceptions. Students also didn’t know when to use equal versus congruent.  I decided to start the class with some claims and warrants. The entire class became involved in the discussion on where = or congruent belongs and WHY it belongs there.

I have also used this to discuss a topic that we learned the day before. Chris had a great activity debating if the best method of finding distance  is the Pythagorean theorem or the distance formula (depending on the information given). I let students work through the three distance problems but also provide a claim and warrant for why they chose that method. At the end of class, we shared our claim and warrants as a class.

I’ve really enjoyed implementing claim and warrants into my class so far. I can’t wait to try (and blog) once I try other things from this session!

Simplifying Rational Expressions: Mafia Edition

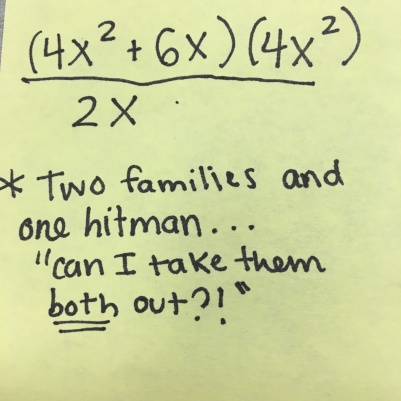
When simplifying rational expressions, students always seem to want to simplify TOO much (and incorrectly) !! Below are a few common”over simplifications” that I’ve seen.


This is where #lifelessonswithFinney kicked in. We started talking about the Mafia. Yes, the Mafia. Not only were we talking about the Mafia, but we were talkinIMG_8864g about killing off family members of the Mafia.
The polynomial is our numerator is a family. The Mafia Family. The denominator is our hitman.

I asked my students what they thought would happen if they tried to kill only one member but not the rest of the family.

“We’d be in trouble!!!! They’d come after us!!!!!!!!!”

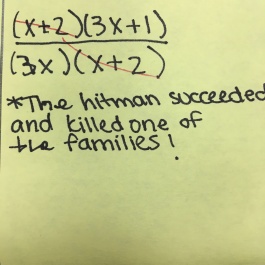
Exactly. So we if we want to kill off one member of the family then we have to kill them all! This is the only way that you’d make it out alive! If you can’t kill them all then it is fully simplified. Killing doesn’t mean you have to get rid of it completely. However, you must “hit” every member of the family. 


Making Percents Real : Apple Edu

I just finished my first week of teaching Algebra 2 ever. On one of the first days, I wanted to dive in and do math, but I didn’t want to intimidate my students so early in the year. Julie Reulbach gave me the great idea of reviewing percents by looking at Apple Computers. Screen Shot 2016-08-22 at 4.56.01 PM

I handed out the sheet I created with no other instructions or introduction than they could work with a partner to figure out the answers.

The worksheet I created explored the 13-inch MacBook Pro. First, I had students find the tax  on the computer and then justify how they found it.

Next, we looked at the price of the 13-inch MacBook Pro compared to the price of the same computer from the Apple Education Store. Students had to find the percent discount.

IMG_8826
The students decided to name my lesson for me 

Third, students had to apply that percent discount to the cost of the 15 inch Macbook Pro to figure out what education price would be.

This is where the conversation became interesting. After everyone was finished, I revealed the actual education price of the Macbook. They were outraged!!! The price was about $100 more than they calculated it should be!!!

This then prompted the question “Do you think this happens for every Apple Product?”

Each group then picked an Apple product. We looked at Macbook Air, Ipads,  and Imacs (I have a class of 8 students).

Students picked what size they first wanted to look at and then found the percent discount from the original price to the education price. Once they found the percent decrease they wrote their percent on the board. They then looked up a different size of the same producIMG_8825t to see if they discount remained the same!

This lead into a discussion about which product receives the biggest discount and why. Also what we thought affected the discount, and how sales aren’t always as straightforward as they seem.

This was a fun, easy, and real-world lesson that helped students review percents without sitting through a review lesson or by doing practice problems.

We did go over the worksheet to address any class misconceptions before we broke out to look up different products.  Originally, many students found the percent tax by finding the tax and then adding it to the original. This was a great opportunity to introduce original(1+percent) which they see for growth and decay later in the chapter.